Category Archives: diy

06.21.11

My Very Own Butterfly Collection.

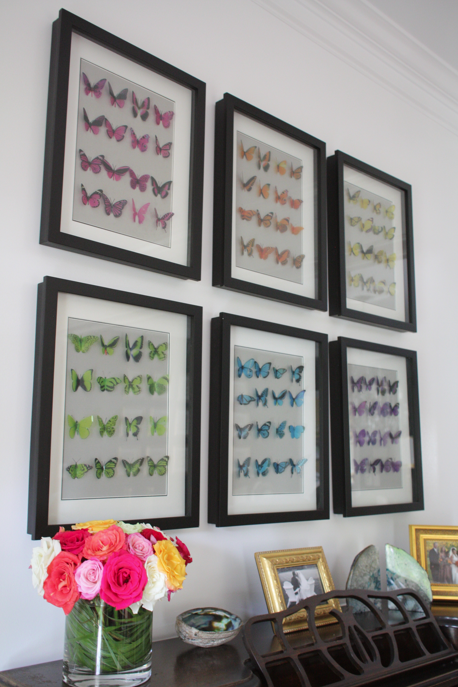
If you have been reading this blog for sometime, you are well aware of my love of butterflies.  You may also have known that I was working on a wall of butterflies for my (work in progress) living room.  Well, here they are:
 While I wanted a wall of butterflies, the whole idea of dead specimens creeped me out.. and ….. I wouldn’t want any of these beautiful creatures killed for my benefit.  Beleive it or not, these little guys are cut out of plastic.
After a long deliberation, I decided to arrange them by color.
I inherited this piano from my parents, and they inherited from my grandmother.  I took lessons on it as a little girl, and soon, E will be too.  We plan to move the piano on the wall to the left, and put these two chairs under the butterflies once they are reupolstered in turquoise linen.
They were so easy to put together… Here’s all it took:
6 of these cases from Michaels (I got them 50% off.)  They have a great grey linen backing.
16 Butterflies in each color.
And last but certainly not least, my trusty glue gun.
Because the cases are an irregular size I had to get custom mats.  I love the way the black inner mat finishes everything off.
And I also love that I now have my own collection of butterflies, and that not one single butterfly was harmed in the process.

06.15.11

Progress.

Remember this update on Lou’s big girl room?  Well, I was finally able to paint her bed.  This bed has special meaning, it was mine when I was a little girl.  I had to prime it first.  The bed was originally white, but my brother painted it black when he inherited it for his bachelor pad in Georgetown.   Gone are his bachelor days… He’s now living in the burbs with his wife, Milena and baby girl, Olivia.  They didn’t need the bed in their new house and I thought it would be so great for Lou to have it.
It took me almost an entire day to paint this baby.  Here is is (back to white) with the primer.
… And the finished product.  I used Duron’s Melon Shine.  I love the color!
I am somewhat embarrassed to show this picture as there is still so much left to do on “Project Big Girl Room.” But we’ve come a long way, baby.  Here’s a peek at what that poor little girl was sleeping on for two months until her Momma painted her bed.
So uncomfortable.  It was two mattresses stacked together.  No wonder why she wouldn’t stay in her bed!
As you can see, her room is pretty small. Here are some shots of it when we were awaiting the arrival of it’s original occupant. Perfect for a crib!
A little more crammed with a Big Girl Bed…
But we are making progress.   I just picked up the green pillows and coverlet at HomeGoods for a grand total of $80. God, I love that store.   The “Anna” letters will be 86’ed.  I’m in the process of designing her new bedskirt and a few other really exciting changes are in the works.  The bookshelves should be done this week.  I am sorry to say that most of the fabrics that I used (I originally designed the nursery 6 years ago) are now discontinued.
1 | 2 | 3 | 4 | 5 | 6 | 7 | 8 | 9 | 10 | 11 | 12 | 13
Stay tuned.. This one’s gonna be GOOD.

05.31.11

God, I love Michaels.

I was looking through some of my old photos this weekend, and came across this little project that I did for E’s Birthday.  Many of you have asked for inexpensive party favor ideas, and here is one of them.

You see, she not only has a birthday party, we also celebrate at school.  So, with all of the money that I shelled out for her party, I was looking for something inexpensive to give to her 13 friends in Kindergarten, particularly since all 13 would be at her party.  The Mommy Gods were with me because with all of the prep for her party, I totally forgot about her school celebration.  I went shopping the night before her birthday. As always, Michael’s did not let me down. I found these monogram journals, and a 24 pack of crayons in the dollar section… better yet- the crayons were on sale for $0.50 each! So I was able to give everyone a great gift for under $20!
(This picture was taken at midnight.) All you need is ribbon, scissors and some Paper Source 2.5 inch labels.    You can download the template here.
 That’s right, 50 cents!
 Aren’t these journals adorable?
 From start to finish, the whole project took 45 minutes.
All packed up and ready to go!

05.16.11

Lou’s Tinker Bell Party

A few weeks ago, I clued you all in on the theme of Lou’s third birthday party.
Courtesy of my friend and neighbor, Amber of Little Moon Photography, we have some amazing pictures to share…
 My friend Kristy Patterson of Sweet Nothings worked meticulously on the candy table.  Those of you who know me, know how obsessive  I am over the details.  Kristy is just as detail-oriented and was open to all of my crazy ideas.  She was an absolute pleasure to work with.
 I just love how everything turned out!
I created the tags in MS Word, and all of the glitter ribbon is from Michaels.  The backboard fabric is from Heather Bailey.


 Once again, Kristy Stone of Tastefully Treated hit a home run with the cake… Kristy is someone who understands and tolerates my OCD.  After I decided I wanted a log slice for a cake stand, she went to several different mill yards in the area to find just the right one.  She’s a genius!
 Many of you had questions on the flowers… I actually special ordered them from Wegmans.  I looked a little weathered (you’ll see below) as I was up until 3 am doing the arrangements.  So worth it!
The fairies in jars were made from Christmas ornaments, Ikea Rajtan jars, fishing wire and wooden toadstools.  The rainbow circles were cut from glitter paper.
The tablecloths were made in this green linen, and sewn by Windows by Melissa .  One thing to note.. the linen wasn’t easy to iron.  Please excuse my mismatched valance (next on the list to be replaced…)
The large toadstools are from Pier 1.
The Ninja-like fairies on the mantle are from Target.  On Friday night as I was arranging them, I called Mike over to take a look (mature, I know) because of the not-so-lady-like positions that they were in.  I tried my best to give them some decorum.
We had a mean game of Pixie Tag. I bought the “Pixie Dust” here.
As you can see, someone finally got her Imperial Trellis shades hung in the kitchen… I love them!  The wreaths, wood chips and moss rocks are from Save On Crafts.
 The goody bags are from Michael’s.  I created the iron-ons in Word.
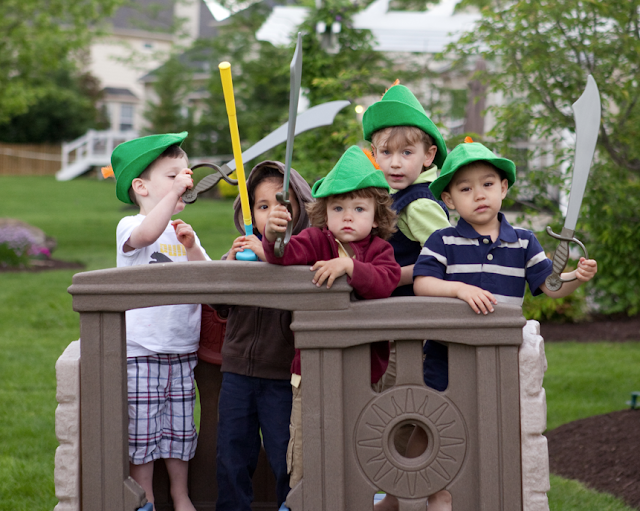
 The Peter Pan hats are from Good’s Place, the fairy wings, wands, swords and tutus are from Designed2BSweet.
The moon bounce was a surprise from her Daddy.  He was so proud that he found a TINKER BELL moon bounce.  It was priceless, when she saw it in the backyard, she gasped and grabbed his hand.  I think I may have seen a little tear well up in his eye.
 Everyone had a ball, including Bailey.
The kids loved playing Fairy Freeze Dance.
Lou kept thanking us saying “this is the best birthday party ever.”
A week later, our house still sparkles with Pixie dust, I think a little will always remain, but it will always remind of us the magical party that we had for our sweet little Anna Lou.

05.11.11

Intaglios.

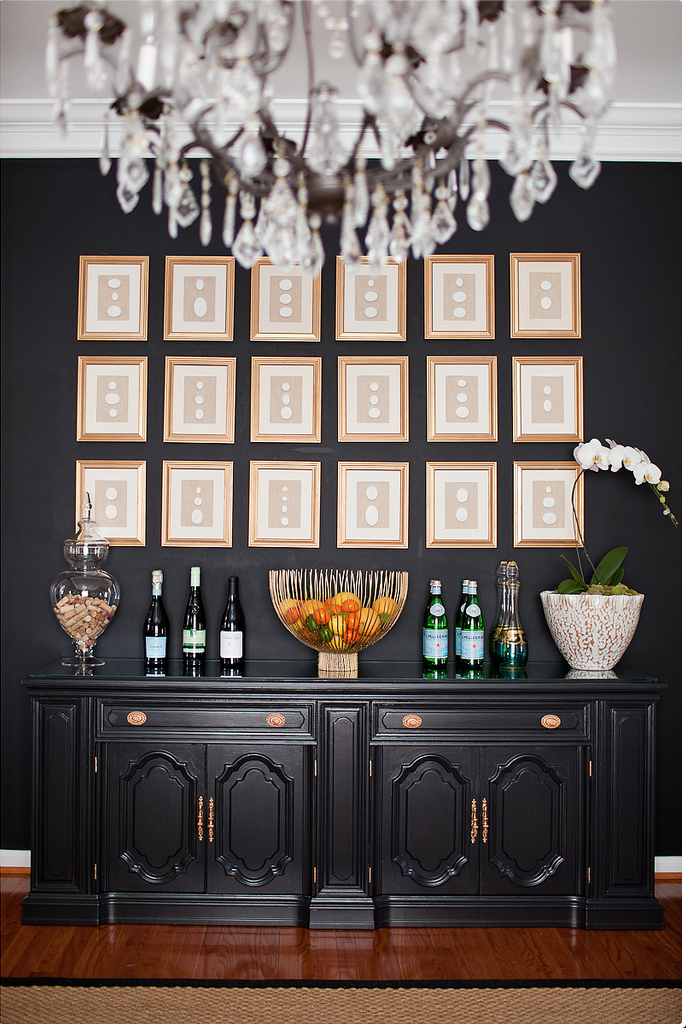
Last week I received the latest Ballard Designs Catalog and my jaw almost dropped when I saw this wall of cameos.  These little pictures are selling for $299 PER picture!  The timing couldn’t have been more perfect because I just finished a wall of 18 for under $200.  And here’s how….
I am notorious for buying items for my next big project and storing them for months if not years before I get to it.  But let’s be honest, with two kids, a full time job and this little blog– I don’t get a lot of spare time for crafting.   That being said, I bought these intaglios over a year ago for the wall in my dining room.  Well, bit by bit, I worked on this project and was able to finish just in time before Lou’s party.  Here are the results:

Here’s the cost break down:

Here’s the how-to:

18 Frames…..
I actually made mine without the glass.  The intaglios were thicker than I expected, so the frames weren’t thick enough for the glass.
 Some spray paint….
 Presto-chango:
I bought this fabric at G-Street Fabrics thinking I’d use the velvet side… but I couldn’t get rid of these darn lines…
So, I decided to use the reverse side, which I now love… it looks like linen, but it’s much more substantial.
 I traced all 18 backboards (fabric backside up) and cut them out.
I used my little craft glue gun to glue the fabric to the cardboard.  One note– make sure to pull the fabric tight to each corner and cut off the excess.  The fabric will stretch.
Then I glued on the intaglios and voila!
Now, with all of that procrastination, the hardest part was actually hanging them.  Thanks to my Pops, who painstakingly hung all 18.  Because the frames were incredibly cheap, the hooks were not evenly attached, so we used double sided velcro tape, which allows me to rearrange them as I choose.
I am so happy with the results!
 
Tutorials are not my thing– but I hope you enjoyed it… Please send me pictures if any of you decide to do your own wall of intaglios!
UPDATE:
Intaglios  |  Kiki's List
See how we updated our dining room here + here.