Category Archives: Our House

06.08.11

Disaster to Delightful.

Three years ago, I bought this Uttermost Chandelier for E’s room from the Lucketts Store.  I left it in my car for a week, and when I took it out the glass cylinder under the crystal strands was shattered to pieces.  At first I FREAKED, but what’s funny is that now I like it even more!  Let me be clear that I paid $300 for it vs. the $800 retail that it now goes for, so it was a much easier pill to swallow.  I think that it now looks much lighter, and more whimsical, perfect for a “Princess” room.  (We had to convince E that she had a Princess room to move her out of the nursery when Anna was born.)
Here she is in E’s room today:
Our little Princess was ecstatic with her big girl room.  Here she is one week after she was evicted from her nursery (I have since swapped out her lamps.. and am seriously considering redoing her entire room again (the chandelier will stay)… This is the insanity that my husband has to live with..)

I am working really hard on not getting upset when “material items” get ruined, but in this case, I actually did myself a favor.  Have any of you ever had a disaster that turned into a delight?

06.03.11

Fresh From The Garden.

I love to keep fresh flowers in our home.  It’s such a treat for me.  Flowers make me happy.    Look at what I plucked from the garden last week!  The aroma that filled my family room was nothing short of devine.
Sadly now, my Peonies are gone for the season… I can’t wait until August when my Pee Gee Hydrangeas are in full bloom!

05.16.11

Lou’s Tinker Bell Party

A few weeks ago, I clued you all in on the theme of Lou’s third birthday party.
Courtesy of my friend and neighbor, Amber of Little Moon Photography, we have some amazing pictures to share…
 My friend Kristy Patterson of Sweet Nothings worked meticulously on the candy table.  Those of you who know me, know how obsessive  I am over the details.  Kristy is just as detail-oriented and was open to all of my crazy ideas.  She was an absolute pleasure to work with.
 I just love how everything turned out!
I created the tags in MS Word, and all of the glitter ribbon is from Michaels.  The backboard fabric is from Heather Bailey.


 Once again, Kristy Stone of Tastefully Treated hit a home run with the cake… Kristy is someone who understands and tolerates my OCD.  After I decided I wanted a log slice for a cake stand, she went to several different mill yards in the area to find just the right one.  She’s a genius!
 Many of you had questions on the flowers… I actually special ordered them from Wegmans.  I looked a little weathered (you’ll see below) as I was up until 3 am doing the arrangements.  So worth it!
The fairies in jars were made from Christmas ornaments, Ikea Rajtan jars, fishing wire and wooden toadstools.  The rainbow circles were cut from glitter paper.
The tablecloths were made in this green linen, and sewn by Windows by Melissa .  One thing to note.. the linen wasn’t easy to iron.  Please excuse my mismatched valance (next on the list to be replaced…)
The large toadstools are from Pier 1.
The Ninja-like fairies on the mantle are from Target.  On Friday night as I was arranging them, I called Mike over to take a look (mature, I know) because of the not-so-lady-like positions that they were in.  I tried my best to give them some decorum.
We had a mean game of Pixie Tag. I bought the “Pixie Dust” here.
As you can see, someone finally got her Imperial Trellis shades hung in the kitchen… I love them!  The wreaths, wood chips and moss rocks are from Save On Crafts.
 The goody bags are from Michael’s.  I created the iron-ons in Word.
 The Peter Pan hats are from Good’s Place, the fairy wings, wands, swords and tutus are from Designed2BSweet.
The moon bounce was a surprise from her Daddy.  He was so proud that he found a TINKER BELL moon bounce.  It was priceless, when she saw it in the backyard, she gasped and grabbed his hand.  I think I may have seen a little tear well up in his eye.
 Everyone had a ball, including Bailey.
The kids loved playing Fairy Freeze Dance.
Lou kept thanking us saying “this is the best birthday party ever.”
A week later, our house still sparkles with Pixie dust, I think a little will always remain, but it will always remind of us the magical party that we had for our sweet little Anna Lou.

05.13.11

That Buffet.
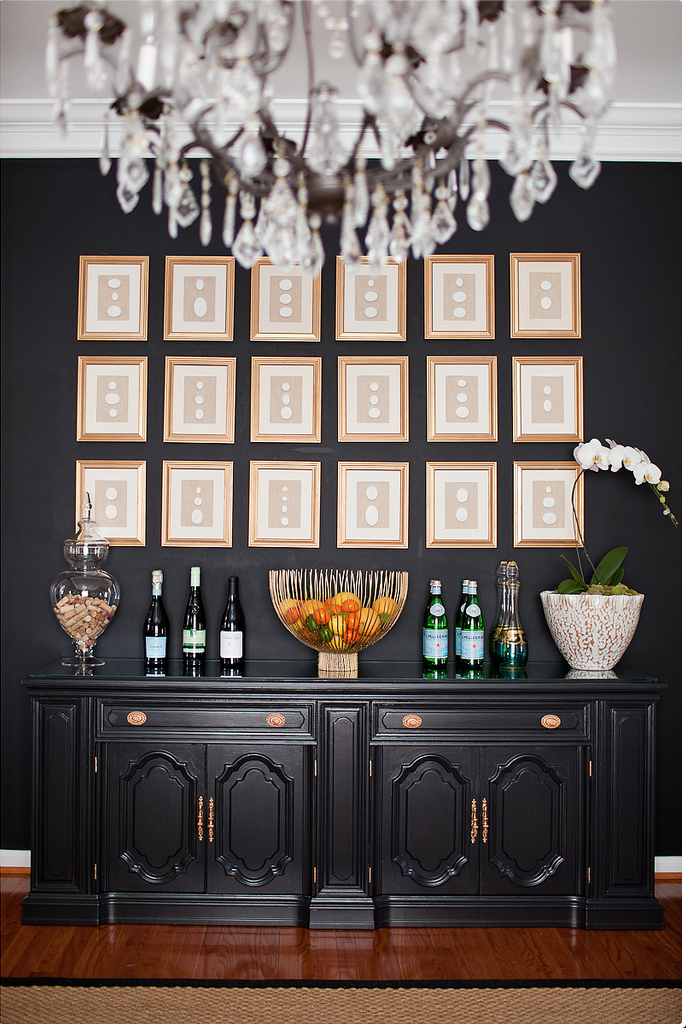
I received a few emails after my post on intaglios about the buffet in our dining room.  It was actually my parent’s.  They bought it in 1969 after they got married.  When my Dad decided to sell my parent’s home to downsize last fall, he asked me if I wanted their dining room set.  At first, I declined because it seemed so formal and ornate… But upon further consideration, I decided to take it.  I couldn’t stand the thought of getting rid of something that held so many family memories.  I am so glad that I did.  With a little updating, we were going to make it our own.

The buffet was actually a hutch.  In an effort to update it, we took the top off.  Here is the before (in my parent’s dining room):

and the after (in our dining room)….
 I plan on painting it to match the walls and the hardware will ultimately be gold. Stay tuned!

05.11.11

Intaglios.

Last week I received the latest Ballard Designs Catalog and my jaw almost dropped when I saw this wall of cameos.  These little pictures are selling for $299 PER picture!  The timing couldn’t have been more perfect because I just finished a wall of 18 for under $200.  And here’s how….
I am notorious for buying items for my next big project and storing them for months if not years before I get to it.  But let’s be honest, with two kids, a full time job and this little blog– I don’t get a lot of spare time for crafting.   That being said, I bought these intaglios over a year ago for the wall in my dining room.  Well, bit by bit, I worked on this project and was able to finish just in time before Lou’s party.  Here are the results:

Here’s the cost break down:

Here’s the how-to:

18 Frames…..
I actually made mine without the glass.  The intaglios were thicker than I expected, so the frames weren’t thick enough for the glass.
 Some spray paint….
 Presto-chango:
I bought this fabric at G-Street Fabrics thinking I’d use the velvet side… but I couldn’t get rid of these darn lines…
So, I decided to use the reverse side, which I now love… it looks like linen, but it’s much more substantial.
 I traced all 18 backboards (fabric backside up) and cut them out.
I used my little craft glue gun to glue the fabric to the cardboard.  One note– make sure to pull the fabric tight to each corner and cut off the excess.  The fabric will stretch.
Then I glued on the intaglios and voila!
Now, with all of that procrastination, the hardest part was actually hanging them.  Thanks to my Pops, who painstakingly hung all 18.  Because the frames were incredibly cheap, the hooks were not evenly attached, so we used double sided velcro tape, which allows me to rearrange them as I choose.
I am so happy with the results!
 
Tutorials are not my thing– but I hope you enjoyed it… Please send me pictures if any of you decide to do your own wall of intaglios!
UPDATE:
Intaglios  |  Kiki's List
See how we updated our dining room here + here.

04.11.11

Big Girl Room.

The time has come.  Our little Anna Lou will be turning three next month, and refuses to sleep in her toddler bed.  It’s time to convert her nursery into a big girl room.  This weekend she inherited my trundle bed from childhood.  I have a lot of ideas for her new bed and bedding.  To give you a sneak peak, here are some inspirations that came to mind….
Stay tuned!

04.06.11

Turning A House Into A Home.

Our house is a typical builder’s grade house. When we originally moved here in 2004, we thought that we would live here a few years and eventually move “up.”  However, we love our house, we love our neighborhood and our neighbors.  One thing I didn’t love- our kitchen.  I will never forget the day of our walk-though. I walked into the kitchen and started bawling my eyes out because I hated the countertops (and really, the whole kitchen.)  My mother (God rest her soul) who was also my Realtor told me to suck it up, that we can always change the counters.   It seemed so wasteful getting rid of them because they were granite.  Albeit ugly granite, but granite nonetheless.
(Image from previous owners, 2003)

The thing that drives my husband crazy (okay, one of the things) about me is that our house is in a constant state of change.   He has come home from a business trip and I will have literally painted an entire room a different color.  I’d like to think it keeps things interesting, he would tell you differently.

Because we decided that we were going to be here for some time we (okay I) started designing to turn this house into a home.   It ended up being more “changes” than Mike signed up for.  We ended up editing a little more than just the countertops.  Most of the major was done work in November of 2009, and while it is not completely finished, I am finally willing to show you some “tweener” shots. (Thanks to Ryann Laden for the pictures)   Here are the results thus far:

Our cabinets were in perfectly good shape, I just hated the color.  So- we painted them.  We built a bulkhead to get rid of that awkward space in between the cabinets and the ceiling.  We also had extra room so we built in some shelving on the end of the island and the lower cabinets.  This has opened up our kitchen so much.  I am so in love with the boards that we had installed on the ceiling.  It wasn’t cheap, but I think it adds so much character to the space.
 Next to the sink we moved two sets of cabinets up to the ceiling and added a cafe shelf.
  We replaced all of the hardware with Gilmore knobs and pulls from Restoration Hardware.
We chose a honed Carrera, which I know is very popular, but it was just a natural fit for the space.
Ahh… My favorite part:  my new apron sink.  I like to call it my double-wide. This was something that I went back and forth on for weeks, and it actually held up the process because I decided at the last minute that I couldn’t live without it- and boy, am I that glad I did.  We had to replace the cabinet under the sink with a smaller one, and that cabinet took about 6 weeks to come in.  Then we had to have the painter come back and paint it (he had already painted the existing cabinet.)
In a few weeks my Imperial Trellis roman shades will be hung.  Again, seems quite predictable, but the color way is so perfect in my kitchen. I tried so many others and none were quite this perfect.
So there you have it- our almost-done kitchen.  I couldn’t be happier with the results and am so happy to come home to it.  The best part?  On Christmas morning last year, Mike looked around and said “Honey, I really love our kitchen. ”  RIP ugly countertops!
  Stay tuned for the exciting changes to our living room, dining room and family room!